|
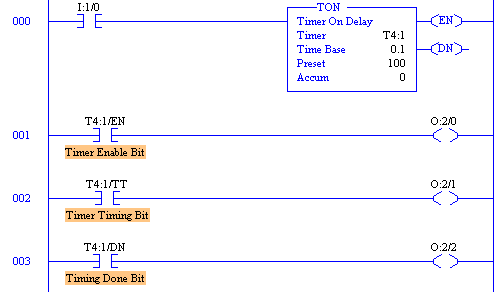
The TON Timer .... (Timer ON Delay)
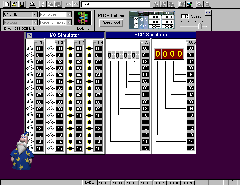
- From the LogixPro Simulations Menu, select the I/O Simulation.
- Clear out any existing program by selecting the "New" entry in the
File menu, and then select the "Clear Data Table" entry in the Simulations
menu.
- Now enter the following program being careful to enter the addresses
exactly as shown.
- Confirm that you have entered the number 100 as the timer's
preset value. This value represents a 10 second timing interval (10x0.1)
as the timebase is fixed at 0.1 seconds:
- Once you have your program entered, and have ensured that it is
correct, download it to the PLC.
- Ensure that Switch I:1/0 is Open, and then place the PLC into the
Run mode.
- Right click on the Timer instruction, and select "GoTo
DataTable" from the drop-down menu.
- Note the initial value of timer T4:1's accumulator and preset
in the spaces below. Also indicate the state of each of the timer's
control bits in the spaces provided:
Initial State (Switch I:1/0=Open):
T4:1.ACC = _____ T4:1.PRE = ______ T4:1/EN = ____ T4:1/TT = ____ T4:1/DN = ____
- Close switch I:1/0, and carefully observe the incrementing of the
timer's accumulator, and the state of each of it's control bits.
- Once the Timer stops incrementing, note the final value of timer T4:1's
accumulator, preset, and the state of it's control bits below:
Final State (Switch I:1/0=Closed):
T4:1.ACC = _____ T4:1.PRE = ______ T4:1/EN = ____ T4:1/TT = ____ T4:1/DN = ____
- Toggle the state of switch I:1/0 a number of times, and observe the
operation of the Timer in both the DataTable display and in the Ladder Rung
program display.
- Confirm that when the rung is taken false, the accumulator and all 3
control bits are reset to zero. This type of timer is a non-retentive
instruction, in that the truth of the rung can cause the accumulator and
control bits to be reset (=0).
Conclusions:
Use the TON instruction to turn an output on or off after the timer has been
on for a preset time interval. This output instruction begins timing when its
rung goes "true". It waits the specified amount of time (as set in the PREset),
keeps track of the accumulated intervals which have occurred (ACCumulator), and
sets the DN (done) bit when the ACC (accumulated) time equals the PRESET time.
As long as rung conditions remain true, the timer adjusts its accumulated value
(ACC) each evaluation until it reaches the preset value (PRE). The accumulated
value is reset when rung conditions go false, regardless of whether the timer
has timed out.
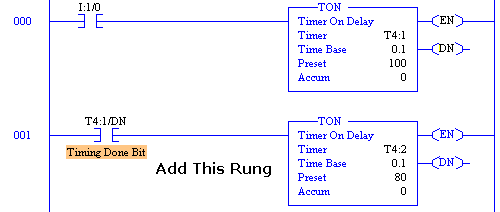
Cascaded TON Timers
- Insert a new rung containing a second timer just below the first rung
as shown below. This second timer T4:2 will be enabled when the first
timer's Done bit T4:1/DN goes true or high (1).
- Once you have completed this addition to your program, download
your program to the PLC and select RUN.
- Toggle the state of switch I:1/0 to ON and observe the operation of
the timers in your program.
- Bring the DataTable display into view, and pay particular attention to
the way in which the timers are cascaded (one timer starts the next).
- Try changing the value of one of the timer presets by double clicking
on the preset value in the DataTable display, and then entering a new
value.
- Run the timers through their timing sequence a number of times. Don't
move on until you are satisfied that the timers are working as you would
expect
In this exercise we have utilized just two timers, but there is nothing
stopping us from sequencing as many timers as we wish. The only thing to
remember is; to use the DN (done) bit of the previous timer to enable the
next timer in the sequence. Obviously locating the timers on consecutive
rungs, and employing consecutive numbering will make such a program much
easier to read and trouble-shoot.
Self Resetting Timers
- Place the PLC into the PGM mode, and modify the first rung of your
program as depicted below.

- Once you have modified your program, download it to the PLC and place
the PLC into the RUN mode.
- Close switch I:1/0 and observe the operation of the timers. The timers
should now be operating in a continuous loop with Timer1 starting Timer2,
and then when Timer2 is done, Timer1 is reset by Timer2's done bit.
As before, when Timer1 is reset, it in turn resets Timer2 which causes
Timer2's done to go low (T4:2/DN=0). Once Timer2's done bit is low, the
sequence is back to where it originally began, and the timing sequence
will start over once again on the very next scan.
- Remove the first instruction (switch XIC I:1/0) from rung zero of your
program.
- Download and RUN this modified version of your program
- Does the timing operation continuously sequence as before? It should!
- Can you stop the timing sequence? Not without taking the PLC out of the
RUN mode! In many applications there may never be a need to stop such a timing
sequence, so a switch might not be used or needed.
In this exercise we cascaded two timers, but as before there is nothing
to stop us from cascading as many timers as we wish. The thing to remember
here is; utilize the DN (XIC or "NOT"done) bit of the last timer in the
sequence to reset the first timer in the sequence. Once again, consecutive
rungs, and numbering will make a program much easier to read and
trouble-shoot.
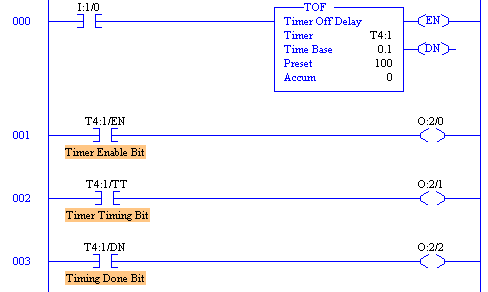
The TOF Timer .... (Timer OFF Delay)
In Allen Bradley PLC programming, the TON timer is by far the most commonly
used type of timer. Most people consider TON timers to be simple to use and
understand. In comparison, many people find the operation of the Allen
Bradley TOF (Timer OFF delay) timer to be less intuitive, but I'm going to let
you decide for yourself.
- Make sure that switch I:1/0 is Closed,
and then enter or modify your existing program to match the one shown
below.
- Once you have your program entered, and have ensured that it is
correct, download it to the PLC.
- Ensure that Switch I:1/0 is Closed, and then place the PLC into the
Run mode.
- Right click on the Timer instruction, and select "GoTo
DataTable" from the drop-down menu.
- Note the initial value of timer T4:1's accumulator and preset
in the spaces below. Also indicate the state of each of the timer's
control bits in the spaces provided:
Initial State (Switch I:1/0=Closed):
T4:1.ACC = _____ T4:1.PRE = ______ T4:1/EN = ____ T4:1/TT = ____ T4:1/DN = ____
- Open switch I:1/0, and carefully observe the incrementing of the
timer's accumulator, and the state of each of it's control bits.
- Once the Timer stops incrementing, note the final value of timer T4:1's
accumulator, preset, and the state of it's control bits below:
Final State (Switch I:1/0=Open):
T4:1.ACC = _____ T4:1.PRE = ______ T4:1/EN = ____ T4:1/TT = ____ T4:1/DN = ____
- Toggle the state of switch I:1/0 a number of times, and observe the
operation of the Timer in both the DataTable display and in the Ladder Rung
program display.
- Confirm that when the rung is taken true, the accumulator and all 3
control bits are reset to zero. The TOF timer like the TON timer is also
a non-retentive instruction and can be reset by changing the truth of
the rung.
Conclusions:
Use the TOF instruction to turn an output on or off after its rung has been off
for a preset time interval. This output instruction begins timing when its rung
goes "false." It waits the specified amount of time (as set in the PRESET),
keeps track of the accumulated intervals which have occurred (ACCUM), and resets
the DN (done) bit when the ACCUM (accumulated) time equals the PRESET time.
The Accumulated value is reset when rung conditions go true regardless of whether
the timer has timed out.
The RTO Timer .... (Retentive Timer ON)
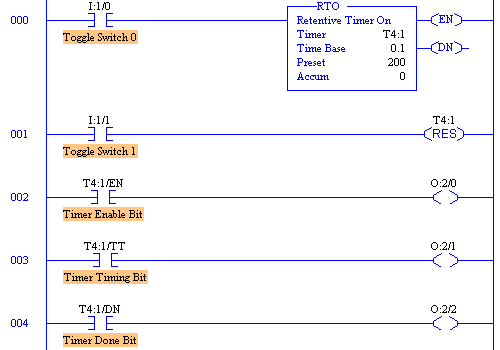
- Make sure that switch I:1/0 is Open, and then replace the TOF timer
in your program with a RTO retentive timer.
- Now insert a new rung below the timer, and add the XIC,I:1/1 and
RES,T4:1 instructions.
- Your program should now match the one shown below:
- Once you have your program entered, and have ensured that it is
correct, download it to the PLC.
- Ensure that both Switches are Open, and then place the PLC into the
Run mode.
- Right click on the Timer instruction, and select "GoTo
DataTable" from the drop-down menu.
- Note the initial value of timer T4:1's accumulator, preset and control
bits. Are we starting off with the same values we had in the TON exercise?
You should be answering Yes.!
- Close switch I:1/0 for 2 or 3 seconds and then Open it again.
- Note that the timer stopped timing when the rung went false, but the
accumulator was not reset to zero.
- Close the switch again and leave it closed which will allow the timer
to time-out (ACC=PRE).
- Once timed out, note the state of the control bits
- Open the switch, and once again note the state of the control bits.
- Now close Switch I:1/1 and leave it closed. This will cause the Reset
instruction to go true.
- Close switch I:1/0 momentarily to see if the timer will start timing
again. It should not!
- Open Switch I:1/1 which will cause the Reset instruction return to false.
- Now toggle switch I:1/0 several times and note that the timer should again
start timing as expected.
- Repeat the foregoing steps, until you are satisfied that you clearly
understand the operation of both the RTO timer, and the Reset instruction.
Conclusions:
An RTO timer functions the same as a TON with the exception that once it has begun
timing, it holds its count of time even if the rung goes false, a fault occurs, the
mode changes from RUN to PGM, or power is lost. When rung continuity returns
(rung goes true again), the RTO begins timing from the accumulated time which was
held when rung continuity was lost. By retaining its accumulated value, retentive
timers measure the cumulative period during which rung conditions are true.
......
|