Koldwater Training Software
Training Applications for the Electrical Controls Industry
Training
Software

Koldwater Training Software
Training Applications for the Electrical Controls Industry
Training
Software

The electric motor troubleshooting problems and solution diamonds below for Motor Fails to Start, from left to right, in order by most common to less common. Tap the first diamond for extra electric motor troubleshooting steps and tips. If the motor problem is not found, click on the next diamond to the right of the last symptom until you find the motor fault.
Check feed connections to the control system and from the control to the motor.
Due to the control panel’s easy access, it is the most common place to first check for voltage to the motor. The top terminals of the motor starter contact, if no voltage you can easily jump to fuses, knife switches, etc. But the first check is visual for motor contactor overload being tripped. If it was, you could click on the “Overload” diamond to read more troubleshooting advice there. Likewise, during the initial visual check, you can note if the motor contactor is engaged. If not, you can check the motor contactor coil for voltage. (If no voltage to the coil, you can trace it back in the schematic, possibly it may lead you to a missing run signal in PLC. If, while checking the voltage on each phase, one leg is missing, you could read more advice at the “Single Phasing at Motor Starter” diamond. If not one of the previously mentioned, go to the next diamond you have not explored yet. They are in order from left to right, most common to less common.
TIP: If overload was tripped or fuse blown, don’t just reset/replace and walk away. You need to find out why the overload tripped or fuse blew.
Check source of power. Check overloads, fuses, controls, etc.
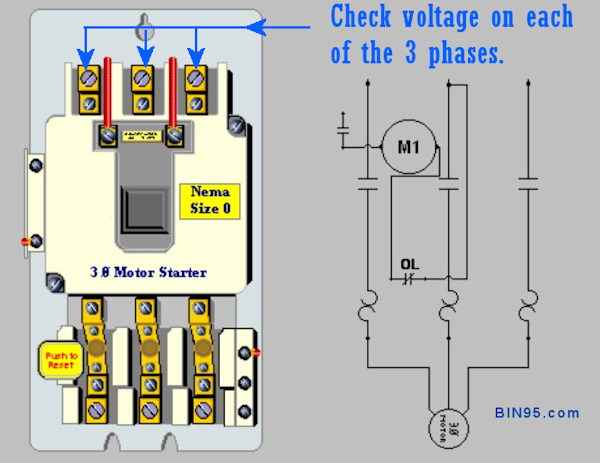
Check the incoming power to the motor starter. Set the digital multimeter (DMM) to voltage mode. Then, use the DMM to verify that all three phases of electrical potential are present.

With the system powered down, locked out, and tagged out. Check the motor starter leads for a phase-to-phase or a phase-to-ground short. If either of these two problems exists, check the motor lead wiring.
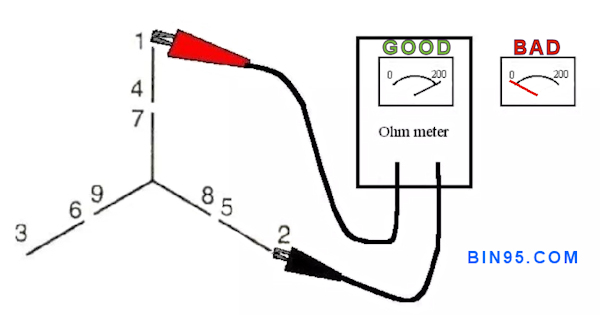
While still locked out, disconnect the incoming motor leads at the AC motor electrical conduit box. Check the motor starter leads for a phase-to-phase or a phase-to-ground short. If either of these two problems exists, check the motor lead wiring.
If you still have a problem, consult an expert electrician or technician for help.
Check the voltage supply and ascertain that the voltage remains within 10% of the rated voltage shown on the motor nameplate.
Checking the motor voltage supply is an essential step in ensuring the proper functioning of electric motors. Using a multimeter and following a few simple steps, you can accurately measure the voltage and identify potential issues affecting the motor's performance.
To check the motor voltage using a multimeter:
Inside the terminal box, you will find three wires for a three-phase motor: L1, L2, and L3. These wires are responsible for supplying power to the motor.
Once your multimeter probes are securely connected.
Th reading should indicate the voltage supplied to the motor. If you have a low-voltage three-phase system, ensure that all three phases are balanced and have similar readings.
It is important to note that low voltage can harm electric motors. When operating below their rated voltae, motors may experience reduced torque output and increased heat generation. This can lead to premature wear and tear of componens or even complete failure if not addressed promptly.
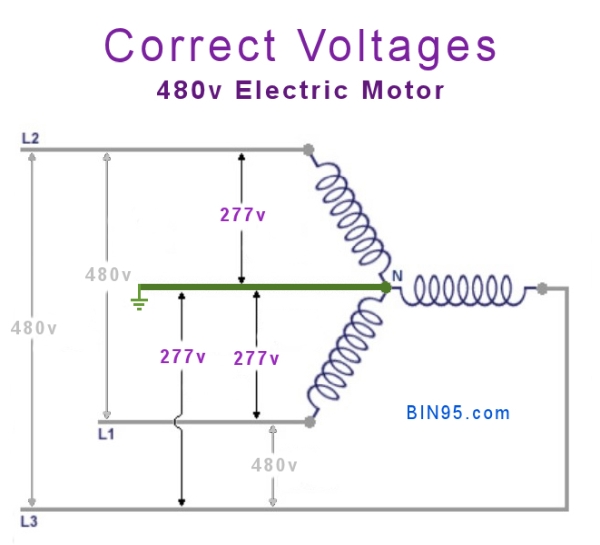
By IEC/NEMA MG-1 Standards, The motor should see at least the motor-rated terminal voltage of no less than 10%/15%, respectively, for continuous operation at rated load.
Example:
480 V, 3-phase ( a typical North American NEMA product).
Steady-state: (+)10% of 480 V = 528 Volts and (-)10% of 480 V = 432 Volts.
In this example, everything is fine if this motor operates between 432 and 528 Volts.
By regulaly checking and monitoring your motor's voltage supply using a multimeter, you can detect deviations from normal operating conditions early on. If you notice consistently lowvoltages or imbalances between phases, it is recommended to consult with an expert or qualified technician who can further diagnose and address any underlying issues.
Compare connections with the wiring diagram on the motor nameplate.
If the motor was just replaced or serviced, incorrectly wiring the electric motor can be a common issue. Compare the motor connections with the motor’s nameplate.
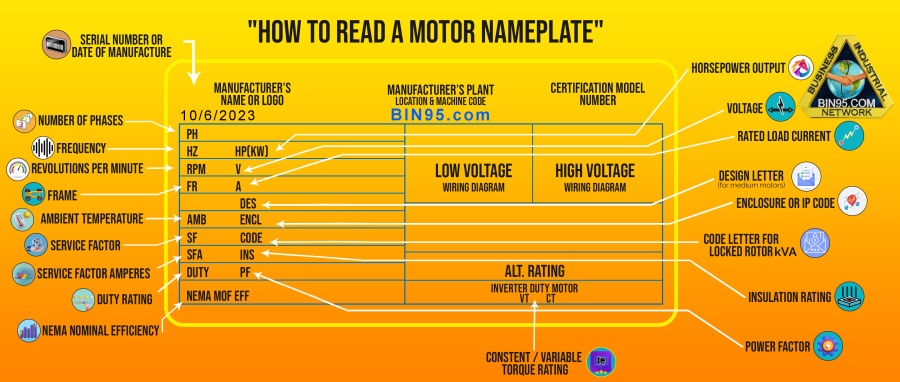
One of the most common challenges faced in motor control is related to 3 phase motor wiring. This type of motor requires precise connections between the power supply and the motor itself. Problems such as incorrect phasing, loose connections, or faulty wiring can result in erratic motor behavior or complete failure.
Control panel wiring is another area where issues often arise. Fortunately, with proper knowledge and attention to detail, many common motor control wiring issues can be easily resolved. Regular maintenance checks and thorough inspections during installation can help identify potential problems before they escalate into major disruptions.
Electric motor ground issues can be a common challenge technicians and electricians face. Addressing grounding issues is crucial when dealing with 3-phase motor wiring problems or control panel wiring. Motors can experience issues without a solid ground connection, such as electrical noise, voltage fluctuations, and equipment damage. These problems can lead to costly repairs and downtime.
To begin the electrical ground testing process, it is essential to follow these steps:


By following these steps, you can effectively test the ground of an electric motor and ensure its safety and reliability. Regularly performing these tests as part of your maintenance routine will help prevent electrical faults, reduce downtime, and extend your motor’s lifespan.
Tighten all connections.
Try to start the motor under no-load conditions. If it starts, the mechanical load on the motor may be too high. The ambient temperature is too high. Overload may be defective, or winding may be shorted or grounded.
Check capacitor, if bad, replace.
Brushes may be worn, dirty or incorrectly fitted.